There's a great wireless hacking/security tool called a "WiFi Pineapple", which costs $100. I found a rather popular blog post, titled "Blue For The Pineapple", showing how to turn a TP-Link TL-WR703N router in to a WiFi Pineapple clone. The reason you'd want to do this? The TP-Link TL-WR703N router costs a mere $20 (I bought mine from this ebay seller) - not a bad saving!
While that blog post has a lot of great information, I found an easier to follow blog post on doing the same with a TP-LINK TL-MR3020 router, and all of those steps worked great for my router. The "Blue For The Pineapple" post also seems to require some tweaks and hacks to get "infusions" working, while following the instructions in this "TL-MR3020" post things seem to work a lot better.
To make things even easier, and save you some time, I've decided to write this blog post and link to pre-made raw USB images you can just write to a USB and (after the steps below) boot.
NOTE: This post is based on Samiux's TL-MR3020 blog post, and I don't understand half of this, I've just provided a way to skip the USB drive creation steps, so I can't really provide any help or support. You could "brick" your router by flashing it with the wrong version of OpenWRT or if you have an unsupported router version - please read all of their documentation, and follow the steps are your own risk!
Basically you need to install OpenWRT on your router, create a USB flash drive from one of the images I provide, configure your router to use the flash drive as it's main storage, and then configure your computer's networking. Here we go:
1. Installing OpenWRT:
Once the router's plugged in and powered on, it should create a wireless access point for you to connect to (or you can plug in via LAN), and browse to 192.168.1.1, and log in with username "admin" and password "admin".
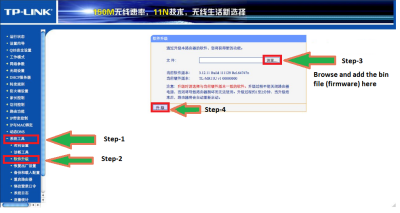
Download the "squashfs-factory.bin" file from the OpenWRT TL-WR703N page, which you will flash your router with. Depending where you bought your router, the web interface might not be in english (mine wasn't) making it somewhat tricky to navigate - the image below shows how to find the screen for updating the firmware with this "squashfs-factory.bin" file:
 After uploading, and restarting, your router should now be running OpenWRT, and should still provide a wireless access point and web interface on 192.168.1.1
2. Making your WiFi Pineapple USB
I've prepared two USB drive images available for download, one with the WiFi Pineapple Infusions and required programs already installed (probably the most convenient for most people), and one without. Download one of them below:
TL-WR703N Pineapple 2.8.1.zip (1.8GB)
TL-WR703N Pineapple 2.8.1 - with infusions.zip (1.8GB)
Extract the file you downloaded and use a disk image copying/writing program such as Win32 Disk Imager or rawrite to write the disk image to your USB drive (2GB of bigger!).
3. Configuring for WiFi Pineapple USB
Connect your TP Link router to your main internet router, or to your PC via LAN cable, plug in the USB drive with the image written to it, and telnet in (note: telnet, not SSH!) to 192.168.1.1 - it should log you in automatically, at which point you can change the root passwd (by running "passwd"), and then you can SSH in.
You need to configure the router for internet access - if you plugged it in to another router with DHCP configured it should set everything up itself, otherwise you may need to enable internet connection sharing on your computer's ethernet connection and configure your router to connect through it ("route add default gw <comptuers_ip>"). Hopefully you can get this part sorted on your own, or use one of the blog posts linked to at the start of this one.
With your TP Link router connected to the internet, and logged in to it via telnet or SSH, run the following commands:
opkg update
opkg install kmod-usb-storage
opkg install kmod-fs-ext4
opkg install block-mount

mkdir -p /mnt/sda2
mount /dev/sda2 /mnt/sda2
mkdir -p /tmp/cproot
mount --bind / /tmp/cproot
tar -C /tmp/cproot -cvf - . | tar -C /mnt/sda2 -xf -
umount /tmp/cproot
umount /mnt/sda2

/etc/init.d/fstab enable
/etc/init.d/fstab start
Next up you'll need to modify one of the config files using "vi", which is somewhat tricky if you don't know it's keys.
Open the file we need to modify with "vi" by running the following command:
vi /etc/config/fstab
Keep pressing the "d" key on your keyboard until all the lines of the file have been removed, then press the "i" key once or twice (until an "i" appears on the screen, then press backspace to remove it), and then paste the following in:
config mount
option target /
option device /dev/sda2
option fstype ext4
option options rw,sync
option enabled 1
option enabled_fsck 0

config swap
option device /dev/sda1
option enabled 1
Press "Esc" (escape) a few times, then type ":w" (to write the changes to the file), then ":q" (to quit). Then type "reboot" to restart the router - causing it boot from the USB drive's files.
4. Accessing your WiFi Pineapple
Having done all of the above, when your router's done booting it will create a wifi access pointed named "pineapple b:e2'" (yeah, I'm not sure why it's named that, but didn't bother changing it). To connect to it via LAN, and share your internet connection with it (which is really required for victims to access the internet through it) you'll need to change your computer's LAN settings to use the IP 172.16.42.42.
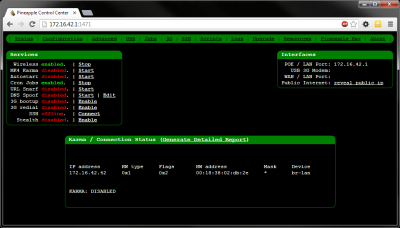
The Pineapple web interface will be running on http://172.16.42.1:1471/ - with username "root", and password "p4ssw0rd". It should look like this:
 You can also SSH in to it with the same login+password. Use the "WP4.sh" script, on Linux, to make it easier to setup internet sharing with your WiFi Pineapple router.
5. Known issues
The USB flash drive images I've provided above are partitioned to 2gb - use linux (or a linux VM) and run Gnome Partition Editor (aka GPartED) to resize the 2nd, larger, partition to the full size of your flash disk to make use of all of it's storage capacity.
sslstrip infusion doesn't work - there's an issue with the kernel modules required for iptables versus the kernel version used in OpenWRT - hopefully a future (non "trunk"), or older, version of OpenWRT might work.
mitm infusion doesn't work - python doesn't seem to want to install "pip" (required to install "mitmproxy" etc) due to it saying "setuptools" isn't installed even though it is.
keylogger infusion doesn't work - says it can't be installed to internal memory (which is actually your USB flash drive)
6. Thanks
A HUGE thanks to Samiux's blog post, for providing all of the information used above in my post, and for making the USB images I've provided!